
Build a Request Schema
Define what gets extracted from a document type — fields, system prompt, per-field prompts — and version it for benchmarking across LLMs.
Want to benchmark a new model against the extraction task you already use in production? Or define a new extraction task entirely? Either way, you build a Request Schema.
A schema declares what fields to pull out of a particular kind of document, the prompts that guide the model, and a version history so older runs stay comparable as you iterate.
This page walks through making one from scratch. For background on what a schema is and how it relates to test sets and model deployments, see View Test Analytics and Run a Manual Test.
What you'll need
- A logged-in account in the Librari Evals admin.
- A clear idea of what document type you're extracting from (e.g. "General Contract", "Invoice").
- A rough sketch of which fields you want extracted and what prompts you'd give a human to do the same job.
The pieces (quick reference)
A schema is a small hierarchy:
Document Type → Request Schema Type → Fields + Base Prompt Versions + Request Schema Versions. Each Request Schema Version pins one Base Prompt Version and one Field Prompt Version per field.
You build one by composing these: pick a Document Type, create a Request Schema Type under it, write the fields and the base prompts that belong to that schema type, then create a Request Schema Version that wires together a specific base prompt and a specific field prompt for each field. Versions are what test runs and the Extract API actually point at — once published, they're immutable, so you iterate by adding new versions instead of editing old ones.
Full definitions of each term — and how they relate to ground truth, test sets, scoring, and the Extract API — are in Concepts.
Walkthrough
1. Open Schema Overview
Sign in at /admin. In the sidebar, click Schema Overview to open the central editor for your schemas. The page lists each Document Type, with its Schema Types nested underneath. Each Schema Type expands to show its Fields, Request Schema Versions, and Base Prompts. A Show: Drafts / Published / Archived filter at the top right hides whichever statuses you don't want to look at right now — handy when you're scanning past your in-progress drafts to find what's actually live.
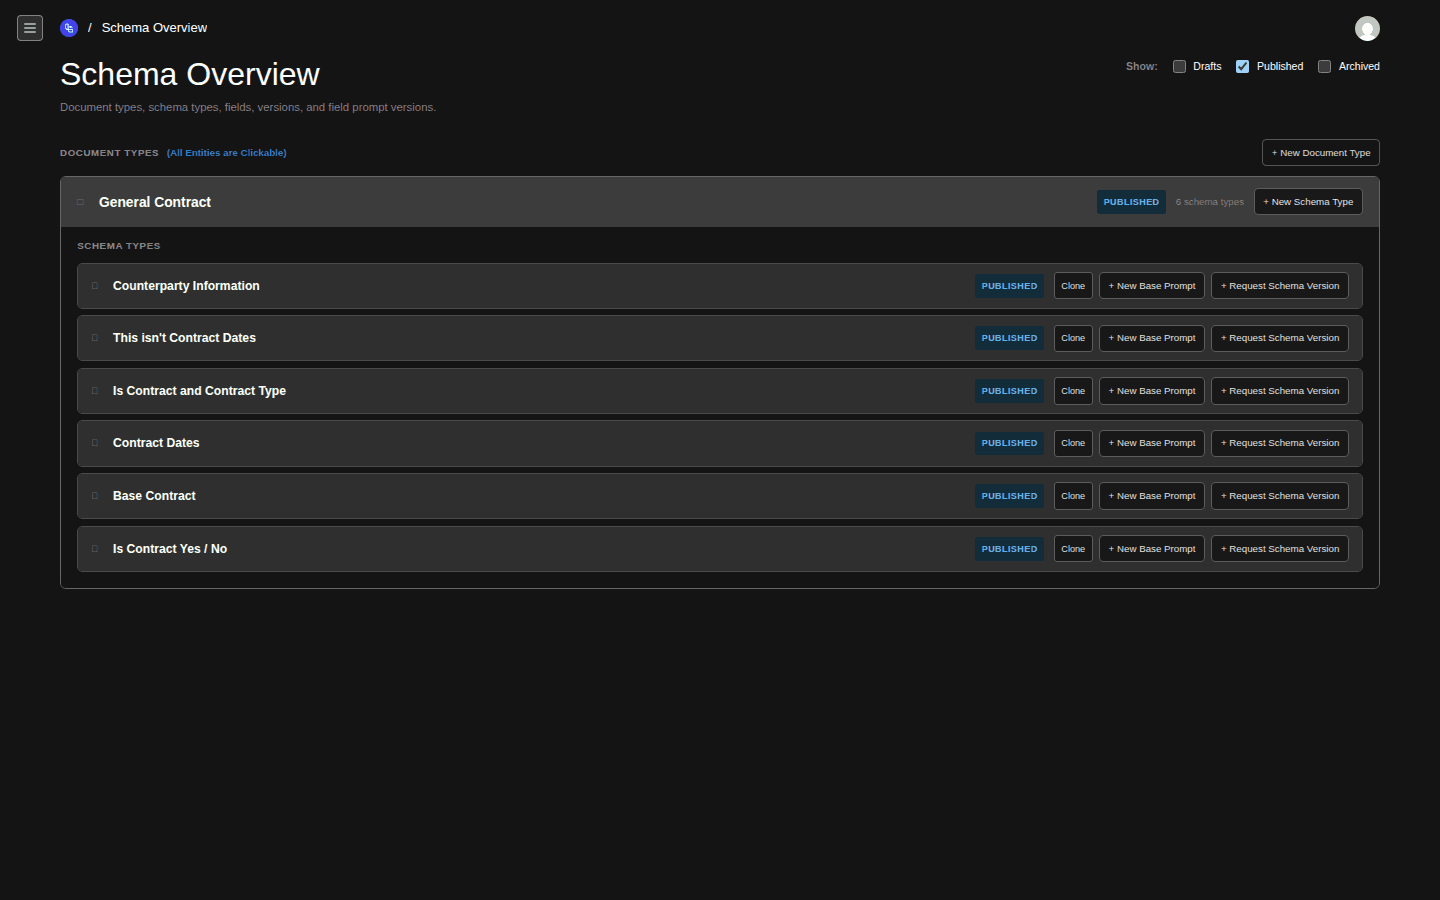
- Show filter (Drafts / Published / Archived)
- + New Document Type button
- Schema Types under a Document Type
- Status badge (Published)
- Per-Schema-Type actions: Clone, + New Base Prompt, + Request Schema Version
2. Create a Document Type
If you don't have one yet, click + New Document Type (1). Give it a short, human-readable name like General Contract and a brief description of what kind of document it represents.
3. Create a Request Schema Type
Inside the new Document Type, click + New Schema Type. Name it after the extraction task — something like MSA Key Terms or Invoice Line Items. This is the parent that holds the fields, the base prompts, and every version of this schema as you iterate.
While the Schema Type is still a Draft, its row in Schema Overview gets two extra buttons — + New Field and Delete — alongside Clone, + New Base Prompt, and + Request Schema Version. Once you publish, those Draft-only buttons disappear (Published Schema Types can't be deleted by non-super-admins, and their fields are added via the version editor instead).
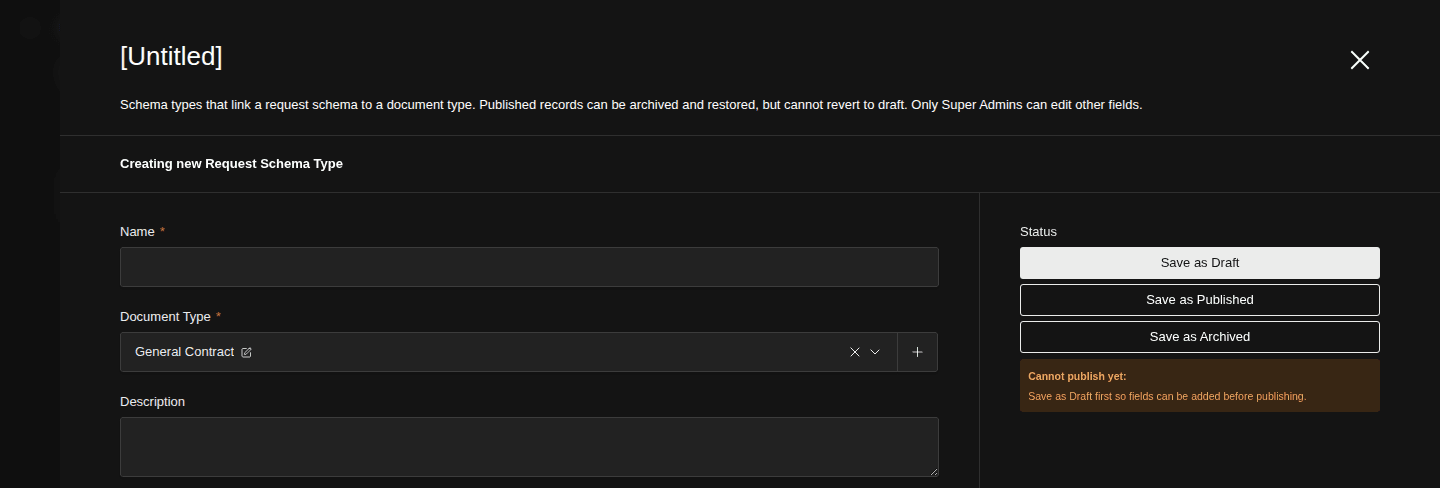
- Name field (required)
- Document Type (prefilled from parent)
- Save as Draft button
- Cannot publish yet callout
4. Create a Request Schema Version (as a Draft)
From the Schema Type's row in Schema Overview, click + Request Schema Version. The new version starts as a Draft — drafts are freely editable; once published, only super-admins can edit them.
The version number auto-increments: the first version is
v1, the next isv2, and so on. You don't pick the number. Versions also carry a free-form Description field — handy for noting "swapped in the new base prompt" or "tightened the date prompt" so you can find the right version weeks later.5. Add fields to the schema version
Inside the version, add the structured fields you want extracted. For each field, you specify:
- Field name — the JSON key the extracted value will land under (e.g.
effective_date,renewal_term_months) - Type — one of
string,integer,decimal,boolean,date,enum,json,array,object - Required — whether the model must produce a value
- Description — natural-language explanation of what the field means; the model sees this
- Allowed values (enum fields only) — one value per line; the model must pick from this list. Tick Enum supplied by caller instead when the list depends on the document rather than the schema — the names of the parties on each contract, say. A field set this way has no list of its own: every Extract API call must pass one via
enumOverrides(see Per-call enum overrides), and each Ground Truth Response defines the list for its document, which test runs and pre-populate use.
Fields can nest. To create a nested object, choose type
objectand add child fields under it — supported up to 10 levels deep.Arrays of objects need a matching rule for scoring. When a test compares the model's output against ground truth, the scorer has to decide which expected entry pairs with which actual entry. There are two ways to tell it:
- Key Field — tick Key Field on one or more scalar children of the array (a party's
name, say). Entries are matched by those values regardless of order, so a list the model returns in a different order still scores correctly. Use this for unordered sets where each entry is identifiable — and note that ground truth then can't contain two entries with the same key values. - Match by position — tick Match by position on the array field itself. Entries are compared first-vs-first, second-vs-second. Use this for ordered lists whose entries can legitimately repeat, such as staged renewal terms ("two options to extend for five years each" is two identical
{count: 5, unit: years}entries — there is no honest key). An array set this way must have no Key Field children; publishing blocks if both are set so it's never ambiguous which rule wins.
Every array with child fields needs one or the other before it (or its schema type) can be published — unless the array is marked Ignored For Testing, in which case it never reaches scoring.
- Field name — the JSON key the extracted value will land under (e.g.
6. Attach a Field Prompt to each field
For each field, attach a Field Prompt Version — the per-field guidance the model uses when extracting that field. You can either:
- Pick an existing field prompt version that's already published, or
- Create a new one inline via the + Add new link in the field's prompt selector.
Each option in the picker shows a preview of the prompt text underneath, so you can pick the right version without opening every one. Field prompts are reusable across schema versions of the same Schema Type, so if you've written a solid "extract a date in ISO 8601 format" prompt for v1, you can reuse it in v2 when only the base prompt changes. Field Prompt Versions also have a free-form Description field for tracking notes ("loosened to allow approximate dates", "added strikethrough handling") that show up alongside the prompt text in the picker.
![The Edit tab of a Request Schema Version (Contract Dates v1) showing the version's Base Prompt Version, an optional Description textarea, Requires Vision and Requires Text checkboxes, and a Field Prompt Assignments panel reading '11 of 11 assigned'. Each schema field (CD Dates [ARRAY], CD Date [DATE], CD Date Exact [STRING], ...) lists a None radio plus one radio per available Field Prompt Version (e.g. 'CD Dates v1') with the prompt text shown inline as a preview, and a View button to open the prompt in full.](/_next/image?url=%2Fdocs%2Fscreenshots%2Fbuild-a-request-schema-3-field-with-prompt.png&w=3840&q=75)
- Base Prompt Version selector (filtered to this Schema Type's prompts)
- Description field for this Request Schema Version
- Field Prompt Assignments header (X of N assigned)
- A field row with its type tag (e.g. CD Date — DATE)
- None vs published-prompt-version radio, with the prompt text shown inline
7. Set the Base Prompt
Every Request Schema Version points at one Base Prompt Version — the system prompt the model sees before any field-specific prompt. Pick an existing base prompt for the parent Request Schema Type, or create a new base prompt version inline. (You can also create one ahead of time from the Schema Type's row in Schema Overview via the + New Base Prompt button.)
Base prompts and field prompts are versioned independently, so you can swap to an improved base prompt for a new schema version while keeping field prompts the same — useful when you want to isolate the impact of a single change in a benchmark.
8. Save and publish the version
Click Save to persist your work as a Draft. When you're ready to use this version for real extractions or benchmarks, change the status to Published and save again.
What you can do with a published Request Schema Version
Once a Request Schema Version is Published, you can:
- Run a Manual Test against it to see how a chosen model performs (Run a Manual Test).
- Schedule Recurring Tests to track how its accuracy holds up over time (Schedule Recurring Tests).
- Call the Extract API with the version's ID, passing a document and getting back structured JSON (Manage Extraction API Keys).
- Export it as LangChain JSON for use in your own pipelines (Export a Schema as LangChain JSON).
Common errors
- "Cannot publish a version with no fields" — a Request Schema Version needs at least one field before it can move from Draft to Published.
- "Cannot publish: not all fields have a Field Prompt Version assigned" — every published field on the Schema Type needs a Field Prompt Version selected before the Request Schema Version can move to Published. Drafts that don't yet have full coverage can still be saved and even run for a quick preview, but they can't be promoted.
Next: use your schema
The most common next step is Run a Manual Test — pick the schema version you just published, pick a model deployment, pick (or assemble) a Test Set, and see how the model scores.
If you're building this for production extraction rather than benchmarking, head to Manage Extraction API Keys to mint a bearer token and start calling the Extract API with this schema version's ID.
Workflow — how to use Librari Evals end-to-end
The full journey from "I have a document type to extract from" to "I'm calling the Extract API in production with a benchmarked, version-pinned schema."
Export a Schema as LangChain JSON
Grab the JSON-schema representation of a published Request Schema Version for use in your own LangChain pipeline.